The whole basis of the pillager farm is rooted in two concepts:
- Only pillagers spawn within the bounding box around a pillager outpost, and
- Any pillagers within range of a raid will join the raid and be removed from the mob cap.
These two concepts put together create an area where an infinite amount of pillagers can spawn. At that point all that then needs to be done is the pillagers have to be prepared and transported to the player to be brutally murdered.
Pillager Outpost Bounding Box
The bounding box is a kind of a pain in the butt. It is a 72x54x72 box area. It’s centered around the middle block of the top floor of the outpost (the floor with the chest on it). But how precisely it is centered is a bit of a mystery and appears to be locational. This is clear if you just look at the dimensions, it’s a two block center! Meaning it can’t really be centered on a single block.
In some instances it was centered on the +X, +Z corner, and in some instances it was centered on the -X, -Z, but it seems like it could be any corner, which is really annoying.
It does appear to consistently spawn at an elevation from +/- 27 block from both the top and bottom surfaces of the block, at least that is consistent even if it doesn’t make a lot of sense.
With carpet mod you can easily find out by placing carpets to check the spawns and just find the dimensions. In vanilla without mods it’s harder, you can of course build a platform and check, but that’s a lot of work, so either build one more block out to be safe, or live with one less block out.
Raid Center
The raid center will be the average position of all of the points of interest within 64 blocks of a player who has triggered a raid.
A raid will start when a player has a point of interest (POI) within a 3x3x3 sub-chunk area around themselves. So the player must be within 32 blocks of a POI, but POI up to 64 blocks away can shift the raid.
Valid points of interest must be claimed by villagers, some common ones are:
- A bed
- A workstation
- A bell
Composters are the most common as they are cheap and easy to force villagers to unclaim.
So when designing these farms you can of course have a single claimed POI within a 3x3x3 subchunk area of the player and that will be the raid center. This will work well, but limits the flexibility of farm design and will probably require a lot of mob-proofing or a world eater.
There are two other options though:
- Moving the raid center
- Shifting the raid center
Move the Raid Center
Moving the raid center uses the same mechanic as stacking raid farms. When all the POIs are destroyed (such as unclaimed by villagers) within the “villager” the game will search for a new villager. It searches for the nearest chunk that is considered a valid villager within a 5x5x5 subchunk region.
“A valid village” chunk does not need to have a POI in itself, but be within a 3x3x3 subchunk region of a valid POI.
If it finds a valid village sub-chunk, the game will center the raid on that sub chunk. To be clear, it is the center of the nearest sub chunk, not the POI itself.
So basically the process would be to have the raid start up near the player, then make the villager unclaim the composter by moving it away, and the game would search for a new raid center, which would require a second POI located within a 6x6x6 subchunk region of the original raid center.
This would result in the raid center moving to the center of a sub chunk next to the sub-chunk the POI is located in. You of course can move it again if you would like, but this seems unnecessary in this particular application.
Shifting the Raid Center
This one is pretty basic. Since the raid center is the average of the POIs within 64 blocks, we can just place two strategically to make the raid center lower than with one villager.
Spawning Rates
There are a couple of factors influencing spawning rates, as really with any natural spawning mob farm:
- The mob cap
- The elevation
- The amount of valid spawning spaces
The mob cap is a non-issue because any pillager that joins a raid will not be counted towards the cap. So we skip this consideration totally.
XP Absorption Rate
Before we get into the spawning we need to consider how much spawning we actually should be achieving. The maim factor is the XP absorption rate. In vanilla minecraft there is an upper limit to how many XP orbs can be absorbed by a player. The limit is 36,000 orbs an hour. The actual absorption limit will be determined by the average orb size. The bigger the orb the higher the limit.
Pillagers drop up to 8 XP per villager. The average XP orb size is 4.2 XP / orb, which results in a maximum XP absorption from pillagers of 151,000 XP/hr
The summary is, any more than this rate in vanilla minecraft is pointless and will just cause lag. It would be awesome if someone wants to test a little bit more the max spawning rate and play with it to dial it in even more, and if you do, please share it and I will update this document!
(Best way to share is via discord, or you can do a direct pull request on the github repo)
Of course, there are plenty of mods that allow you to absorb more XP orbs, in that case the more the better, but that will be on an individual basis.
Impact of Elevation
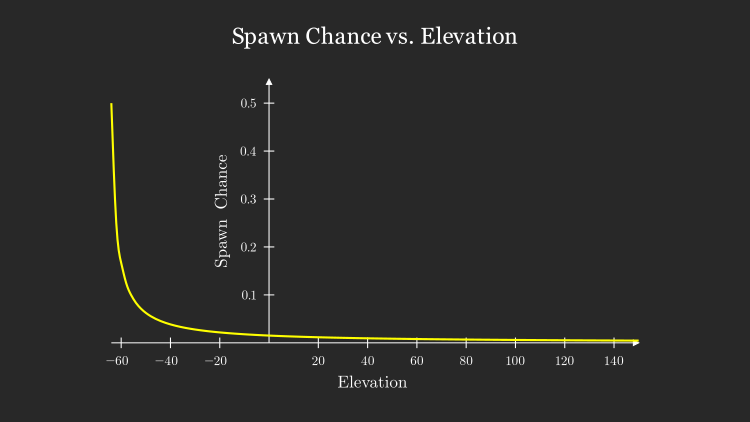
As is fairly commonly known, elevation plays a huge part in the mob spawning algorithm. The game basically picks a random x-z coordinate in a chunk, then on that column picks a random y-value for the heightmap of that column.
The heightmap is the highest block elevation minus the lowest possible elevation, then plus 2. The plus 2 is a part of the heightmap and basically represents spawning from the void to the surface of the block.
So in the overworld, like for the pillager farm, with \(y = elevation\), the equation for selecting any single elevation is: \[ \begin{equation}\label{eq:1} p(y) = \frac{1}{y-(-64)+2}\longrightarrow\frac{1}{y+66} \end{equation} \]
This of course results in a very small chance of spawning, but we can improve it by making multiple platforms, with \(n = \text{number of platforms}\), \(y_{top}=\text{top platform elevation}\).
\[ \begin{equation}\label{eq:2} p(y_{top},n) = \frac{n}{y+66} \end{equation} \]
Typically the minimum platform height is going to be the determining limit that restricts where a series of platforms is built, then you would build up from that minimum height. So we can find the top platform elevation by:
\[ \begin{equation}\label{eq:3} y_{top}(y_{min}) = y_{min}+3*n \end{equation} \]
Plugging this into Equation \(\ref{eq:2}\):
\[ \begin{equation}\label{eq:4} p(y_{min},n) = \frac{n}{y_{min}+3*n+66} \end{equation} \]
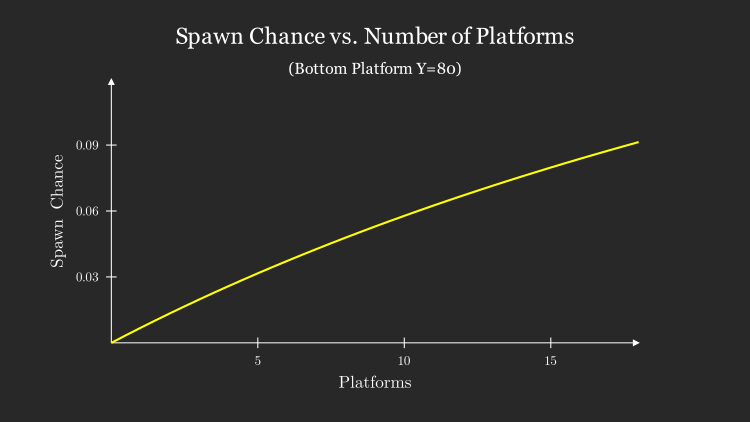
Using this we can find probability of a valid elevation being selected for different \(y_{min}\) elevations and platform numbers.
From testing in game we found that a \(p() = 3.8%\) with about 1800 blocks results in max absorption.
Lower elevations won’t give you more XP in vanilla minecraft but it may allow for less and/or smaller platforms.
Size of Platforms
The size of the platforms is also very important for the spawning rates. A larger platform will of course spawn more. This is not as straightforward a calculation as elevation and is much easier to simulate than calculate in practice.
That said here we have not decided to dig that deep so the conclusion is that we used 1800 blocks, higher elevations or less platforms will result in more blocks required. Lower elevations or more platforms will require less blocks.
Other Design Considerations
The other two major design considerations are:
- Ease of building
- Lag
Ease of Building
This is pretty straightforward, the easier to build the better. For instance is it easier to have less villagers and bigger platforms? Or more more villagers and less total blocks?
Lavacasting is very helpful in this build, there is even an effort to design lavacasting the platforms, which will make building much easier.
Lag
These farms are high entity farms. Entities are one of the biggest sources of lag, so handling them well is important.
Reducing entity lifetime
The faster we can kill the pillagers the less will be alive on average, which will reduce the overall lag.
Factors such as platform size and transportation method will help reduce lifetime. We found that using pillager pathfinding instead of water was an effective way to reduce lifetime. Other considerations such as platform size and shape will impact lifetime.
You can also put the kill chamber below the farm and drop pillagers to greatly reduce the lifetime, but this is less viable in survival.
Collisions
Collisions are a demanding calculation in minecraft and often a source of lag. In a farm like this it is difficult to reduce collisions, but we should strive to reduce collisions as much as possible.